
Hello collegues! In this article we will deploy virtual enviroment for different testing tasks with Vagrant and Powershell DSC. In this part we will start from minimal requirement of any Windows domain infrastructure – Active directory domain services. In our case sandbox will consist of 2 nodes: domain controller and domain member host.
Why is it needed?
This is a main question that need to answer. I think that everybody has his own opinion about this question. However, in general, this method allow to reduce the time needed to configure virtual labaratory.
Once we prepared the automation scenario, it can be reused on demand later. The benefit of this method is no need to do many actions by hand. We can save our time and also exclude different mistakes and wrong actions we can do while configuration.
In other words – if we have a task to simulate the work of your infrastructure components, we will face with first question:
How to do it?
It is OK if we need to test any components or software in our enviroment. But what if we need to check more complex scenario, e.g., difficult Active Directory topology?
When we realizing how much actions need to do by hand we will face with second question:
How to automate it?
This article is devoted to the answer to this question. Lets go further and we will know more about this.
Stack of used technologies and boring terminology
At a beginning we need to find our more about software and terminology that are required for further work.
Provider – in Vagrant’s terminology, the underlying virtualization solutions (VirtualBox, VmWare, Hyper-V) are called providers. It is a layer of virtualization vagrant based on.
VirtualBox – one of provider examples. We can create and configure virtual machines by this component. In this article we are using VirtualBox as default vagrant provider. Depending on the provider Vagrant configuration can differ.
Vagrant – this component automates virtual machines deploy configuration. This layer provides one style configuration virtual machines deployment.
Powershell DSC (Desired State Configuration) – task automation tool, which is based on a declarative paradigm (declarative approach). In other words, we describe the state that we want to receive, but do not describe the obtaining process of this state. We will see some magic during DSC configuration. 🙂
DSC resources – special modules that allow us to configure the system. This modules uses during dsc configuration.
Installing required software on Windows host
Automatic installation
There is a great possibility to automate this process by installation via Chocolatey package manager.
- Windows 7+ / Windows server 2003+
- Powershell v2+
- .NET Framework 4+
If all dependencies are resolved, open cmd.exe as Administrator and paste the command below.
@"%SystemRoot%\System32\WindowsPowerShell\v1.0\powershell.exe" -NoProfile -InputFormat None -ExecutionPolicy Bypass -Command "iex ((New-Object System.Net.WebClient).DownloadString('https://chocolatey.org/install.ps1'))" && SET "PATH=%PATH%;%ALLUSERSPROFILE%\chocolatey\bin" && choco install -y vagrant & choco install -y virtualbox
Manual installation
Of course we can use manual installation. To do it we need to:
- Download and install VirtualBox software
- Download and install Vagrant software
It is not too hard to install this packages so we will skip this section and go further.
Sandbox deployment
A little notice. First, we will do some actions without much investigation, and only then we will figure out what we got there and why it works or does not.
Lets create our test laboratory project and form the files structure specified below:
- LAB – root project folder.
- Vagrantfile – file with instructions to deploy virtual machines.
- provision – folder where DSC configurations are located (will use to configure virtual machine).
- Files with .ps1 extension – DSC configurations for setup the system.
Now we need to define purpose each DSC configuration.
- ConfigureRebootOnNode.ps1 – configures host reboot if needed.
- DSCInstallDHCP.ps1 – install DHCP role, RSAT-DHCP component, authorize DHCP server in AD after installation and configure scope.
- DSCInstallDomain.ps1 – install AD DS role, RSAT-ADDS component, configure PARTY.HARD domain.
- DSCJoinDomain.ps1 – add host to Active Directory domain.
- PreDSCInstall.ps1 – install required for work DSC modules.
Here is the project result structure we will get:
LAB
 │   Vagrantfile
 │
 └───provision
         ConfigureRebootOnNode.ps1
         DSCInstallDHCP.ps1
         DSCInstallDomain.ps1
         DSCJoinDomain.ps1
         PreDSCInstall.ps1
Copy Vagrantfile in project folder.
Vagrantfile
# -*- mode: ruby -*-
# # vi: set ft=ruby :
Vagrant.configure("2") do |config|
  config.vagrant.plugins = "vagrant-reload"
  config.vm.define "lab-dc1" do |subconfig|
    subconfig.vm.box = "gusztavvargadr/windows-server"
    subconfig.vm.hostname = "lab-dc1"
    subconfig.vm.provider :virtualbox do |vb|
      vb.gui = false
    end
    subconfig.vm.network "private_network", ip: "192.168.11.2",
      virtualbox__intnet: true
    subconfig.winrm.username = "vagrant"
    subconfig.winrm.password = "vagrant"
    subconfig.winrm.transport = :plaintext
    subconfig.winrm.basic_auth_only = true
    #Install DSC Modules
    subconfig.vm.provision "shell",
      path: "provision\\PreDSCInstall.ps1"
    #https://github.com/dsccommunity/ActiveDirectoryDsc
    subconfig.vm.provision "shell",
      path: "provision\\DSCInstallDomain.ps1"
    #Restart VM to finish Active Directory Domain Services installation
    subconfig.vm.provision :reload
    #https://github.com/dsccommunity/xDhcpServer
    subconfig.vm.provision "shell",
      path: "provision\\DSCInstallDHCP.ps1"
  end

  config.vm.define "lab-test" do |subconfig|
    subconfig.vm.box = "gusztavvargadr/windows-server"
    subconfig.vm.hostname = "lab-test"
    subconfig.vm.provider :virtualbox do |vb|
      vb.gui = false
    end
    subconfig.vm.network "private_network", ip: "127.0.0.2",
      auto_config: false,
      virtualbox__intnet: true
    subconfig.winrm.username = "vagrant"
    subconfig.winrm.password = "vagrant"
    subconfig.winrm.transport = :plaintext
    subconfig.winrm.basic_auth_only = true
    subconfig.vm.provision "shell",
      path: "provision\\ConfigureRebootOnNode.ps1"
    subconfig.vm.provision "shell",
      path: "provision\\PreDSCInstall.ps1"
    subconfig.vm.provision "shell",
      path: "provision\\DSCJoinDomain.ps1"
  end
end
Copy PreDSCInstall.ps1 file in provision folder.
Install-Module -Name ActiveDirectoryDsc -Force
Install-Module -Name PSDscResources -Force
Install-Module -Name ComputerManagementDsc -Force
Install-Module -Name xDhcpServer -Force
Copy DSCInstallDomain.ps1 file in provision folder.
DSCInstallDomain.ps1
Configuration ADDomain_NewForest_Config
{
    param
    (
        [Parameter(Mandatory = $true)]
        [ValidateNotNullOrEmpty()]
        [System.Management.Automation.PSCredential]
        $Credential,

        [Parameter(Mandatory = $true)]
        [ValidateNotNullOrEmpty()]
        [System.Management.Automation.PSCredential]
        $SafeModePassword
    )

    Import-DscResource -ModuleName PSDscResources
    Import-DscResource -ModuleName ActiveDirectoryDsc
    Import-DscResource -ModuleName ComputerManagementDsc

    Node 'localhost'
    {
        WindowsFeature 'Active Directory Domain Services'
        {
            Name   = 'AD-Domain-Services'
            Ensure = 'Present'
        }

        WindowsFeature 'RSAT-ADDS'
        {
            Name   = 'RSAT-ADDS'
            Ensure = 'Present'
        }

        ADDomain 'party.hard'
        {
            DomainName                    = 'party.hard'
            Credential                    = $Credential
            SafemodeAdministratorPassword = $SafeModePassword
            ForestMode                    = 'WinThreshold'
        }
    }
}

#Next block is using to allow password as plain text
$cd = @{
    AllNodes = @(
        @{
            NodeName = 'localhost'
            PSDscAllowPlainTextPassword = $true
         }
    )
}

#Define user and password for ADDomain deployment (also used for restore).
$password = ConvertTo-SecureString "RestorePassword123$" -AsPlainText -Force
$cred = New-Object System.Management.Automation.PSCredential('vagrant',$password)

#Create MOF
ADDomain_NewForest_Config -Credential $cred -SafeModePassword $cred -ConfigurationData $cd

#Execute MOF
Start-DscConfiguration -Path .\ADDomain_NewForest_Config -Force -Wait -Verbose
Copy DSCInstallDHCP.ps1 file in provision folder.
DSCInstallDHCP.ps1
Configuration xDhcpsServerScope_NewScope
{
    Import-DscResource -ModuleName xDHCpServer
    #Define NIC IP
    $IP = Get-NetIPAddress -InterfaceAlias "Ethernet 2" | Where-Object {$_.IPAddress -notlike "*:*" } | select -ExpandProperty IPAddress

    Node 'localhost'
    {
        WindowsFeature 'RSAT-DHCP'
        {
            Name   = 'RSAT-DHCP'
            Ensure = 'Present'
        }

        WindowsFeature 'DHCP'
        {
            Name   = 'DHCP'
            Ensure = 'Present'
        }

        xDhcpServerAuthorization RemoteServerActivation
        {
            Ensure = 'Present'
            DnsName = $env:COMPUTERNAME + '.party.hard'
            IPAddress = $IP
        }


        xDhcpServerScope Scope
        {
            ScopeId = '192.168.11.0'
            Ensure = 'Present'
            IPEndRange = '192.168.11.254'
            IPStartRange = '192.168.11.10'
            Name = '11.0/24'
            SubnetMask = '255.255.255.0'
            LeaseDuration = ((New-TimeSpan -Hours 8 ).ToString())
            State = 'Active'
            AddressFamily = 'IPv4'
        }

        xDhcpServerOption Option
        {
            Ensure = 'Present'
            ScopeID = '192.168.11.0'
            DnsDomain = 'party.hard'
            DnsServerIPAddress = '192.168.11.2'
            AddressFamily = 'IPv4'
            Router = '192.168.11.1'
        }
    }
}

xDhcpsServerScope_NewScope
Start-DscConfiguration -Path .\xDhcpsServerScope_NewScope -Force -Wait -Verbose
Copy DSCJoinDomain.ps1 in provision folder.
DSCJoinDomain.ps1
Configuration JoinDomainConfiguration
{
    param
    (
        [Parameter(Mandatory = $true)]
        [ValidateNotNullorEmpty()]
        [System.Management.Automation.PSCredential]
        $Credential
    )

    Import-DscResource -Module ComputerManagementDsc

    Node 'localhost'
    {
        Computer JoinDomain
        {
            Name       = $env:COMPUTERNAME
            DomainName = 'PARTY'
            Credential = $Credential # Credential to join to domain
        }
    }
}


#Next block is using to allow password as plain text
$cd = @{
    AllNodes = @(
        @{
            NodeName = 'localhost'
            PSDscAllowPlainTextPassword = $true
         }
    )
}

#Define user and password for ADDomain deployment (also used for restore).
$password = ConvertTo-SecureString "vagrant" -AsPlainText -Force
$cred = New-Object System.Management.Automation.PSCredential('party.hard\vagrant',$password)

#Create MOF
JoinDomainConfiguration -Credential $cred -ConfigurationData $cd

#Execute MOF
Start-DscConfiguration -Path .\JoinDomainConfiguration -Force -Wait -Verbose
Copy ConfigureRebootOnNode.ps1 file in provision folder.
ConfigureRebootOnNode.ps1
Configuration ConfigureRebootOnNode
{
    Node 'localhost'
    {
        LocalConfigurationManager
        {
            RebootNodeIfNeeded = $true
        }
    }
}

#Create MOF
ConfigureRebootOnNode
Set-DscLocalConfigurationManager .\ConfigureRebootOnNode -Verbose
Get-DscLocalConfigurationManager
Project structure is ready. What is next?
We have completed the most difficult part, congratulations. Now to deploy our test laboratory it is enough to run the command in cmd:
vagrant up
That’s all. Let’s go drink some tea. Depending on the performance of your machine and the speed of the Internet, you may have to drink more than one mug 🙂
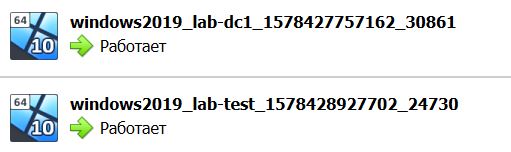
When you return, you will find a small virtual environment that consists of two nodes. We can verify this by running the command:
vagrant status
We will see list of running virtual machines:
Current machine states:
lab-dc1                   running (virtualbox)
lab-test                  running (virtualbox)
This environment represents multiple VMs. The VMs are all listed
above with their current state. For more information about a specific
VM, run `vagrant status NAME`.
Or we can open VirtualBox VM Manager. We will see the same virtual machines and same status.
What happened under the hood?
Vagrant
Let’s take a step-by-step look at what happened. All key logic are described in the Vagrantfile. For convenience, I added comments to the lines. Let’s go back to the Vagrantfile and consider the configuration of one of the machines.
config.vm.define "lab-dc1" do |subconfig|
    #Define OS image box for VM. Vagrant will download the box from the public repository (https://app.vagrantup.com/boxes/search)
    subconfig.vm.box = "gusztavvargadr/windows-server"
    #Define VM hostname
    subconfig.vm.hostname = "lab-dc1"
    #Define virtualization provider settings (not mandatory)
    subconfig.vm.provider :virtualbox do |vb|
        #Run VM in backgroung
        vb.gui = false
    end
    #Define network configuration: nic type, ip.
    subconfig.vm.network "private_network", ip: "192.168.11.2",
        virtualbox__intnet: true
    #Define login and password for VM winrm connection and provision.
    subconfig.winrm.username = "vagrant"
    subconfig.winrm.password = "vagrant"
    #Define connection parameters.
    subconfig.winrm.transport = :plaintext
    subconfig.winrm.basic_auth_only = true
    #Run Powershell script that will install requirement DSC modules
    subconfig.vm.provision "shell",
        path: "provision\\PreDSCInstall.ps1"
    #Run Powershell DSC configuration that will deploy AD DS
    #https://github.com/dsccommunity/ActiveDirectoryDsc
    subconfig.vm.provision "shell",
        path: "provision\\DSCInstallDomain.ps1"
    #Reboot VM after AD DS installation
    subconfig.vm.provision :reload
    #Run Powershell DSC configuration that will install and configure DHCP service
    #https://github.com/dsccommunity/xDhcpServer
    subconfig.vm.provision "shell",
        path: "provision\\DSCInstallDHCP.ps1"
end
Unfortunately this article does not fully cover the Vagrant topic. If you want to know more about it I can recomend to read official documentation.
Additional materials
https://www.vagrantup.com/docs/
The DSC configurations used in the deployment process should also be considered. Let’s go back to them to understand the working principles.
Powershell DSC
At the beginning of the article, it was already mentioned that, unlike the usual PowerShell scripts, DSC configurations uses a declarative approach. Please note that we do not indicate exactly how we will bring the system to the desired state. In fact, we only need to declare (describe) the desired state.
Also at the beginning of the article, the concept was mentioned – Powershell resources. For PowerShell DSC technology, the concept of resources is the key. DSC resources performs configuration described in DSC configurations. There are both standard resources (included in the system) and user resources (imported separately).
You may have noticed that resources are imported in some configurations. These are examples of user (extensible) resources that have been downloaded from the github repository of the dsccommunity community.
For example we will review DSCInstallDHCP.ps1 configuration that install and configure DHCP. I added comments to the lines.
#Declare configuration name
Configuration xDhcpsServerScope_NewScope
{
    #Import requirement resources
    Import-DscResource -ModuleName xDHCpServer
    #Declare hosts that needs to configure
    Node 'localhost'
    {
        #Declare RSAT-DHCP component installation by WindowsFeature resource (standart resource example)
        WindowsFeature 'RSAT-DHCP'
        {
            #Declare requirement resource filels (component name and status).
            Name   = 'RSAT-DHCP'
            Ensure = 'Present'
        }
        #Declare DHCP component installation by WindowsFeature resource (standart resource example)
        WindowsFeature 'DHCP'
        {
            #Declare requirement resource fields (component name and status).
            Name   = 'DHCP'
            Ensure = 'Present'
        }
        #Declare DHCP Server authorization by xDhcpServerAuthorization resource (user resourse example)
        xDhcpServerAuthorization LocalServerActivation
        {
            Ensure = 'Present'
        }
        #Declare DHCP scope creation by xDhcpServerScope
 resource (user resourse example).
        xDhcpServerScope Scope
        {
            #Declare score settings
            ScopeId = '192.168.11.0'
            Ensure = 'Present'
            IPEndRange = '192.168.11.254'
            IPStartRange = '192.168.11.10'
            Name = '11.0/24'
            SubnetMask = '255.255.255.0'
            LeaseDuration = ((New-TimeSpan -Hours 8 ).ToString())
            State = 'Active'
            AddressFamily = 'IPv4'
        }
        #Declare DHCP patameters creation by xDhcpServerOption resource (user resourse example).
        xDhcpServerOption Option
        {
            Ensure = 'Present'
            ScopeID = '192.168.11.0'
            DnsDomain = 'party.hard'
            DnsServerIPAddress = '192.168.11.2'
            AddressFamily = 'IPv4'
            Router = '192.168.11.1'
        }
    }
}
#Create MOF file to execute configuration
xDhcpsServerScope_NewScope
#Execute configuration
Start-DscConfiguration -Path .\xDhcpsServerScope_NewScope -Force -Wait -Verbose
Unfortunately this article does not fully cover the Powershell DSC topic. If you want to know more about it I can recomend to read official documentation.
Additional materials
https://docs.microsoft.com/en-us/powershell/scripting/dsc/overview/overview?view=powershell-7
Is it work?
It is a reasonable question. 🙂
I suggest to make sure that all services have been deployed and correctly configured in accordance with the described requirements.
What functionality do we expect from the our sandbox?
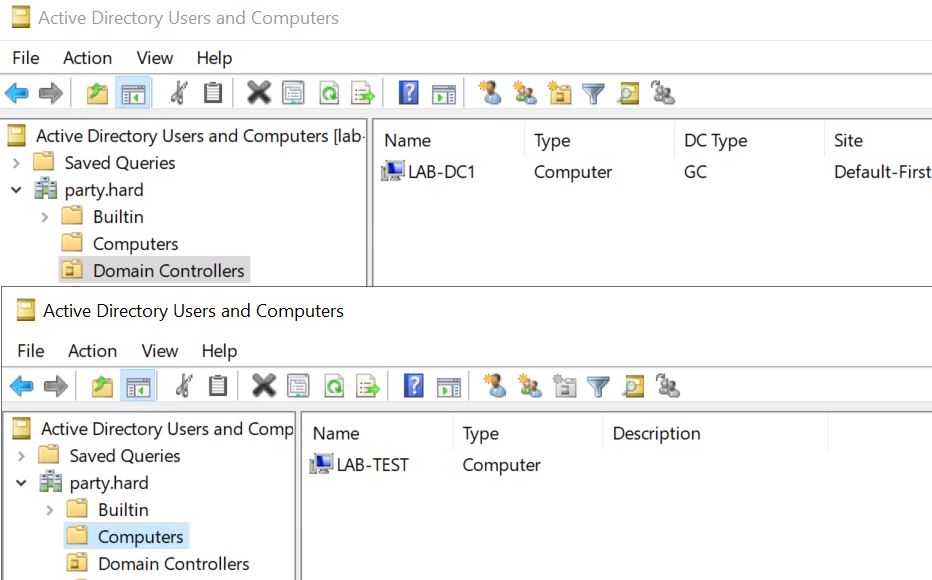
Globally, we expect two hosts on the local network 192.168.11.0/24. One is the domain controller PARTY.HARD, the other is a member of this domain.
LAB-DC1 — 192.168.11.2
- Active Directory Domain Services
- AD RSAT
- PARTY.HARD domain configuration.
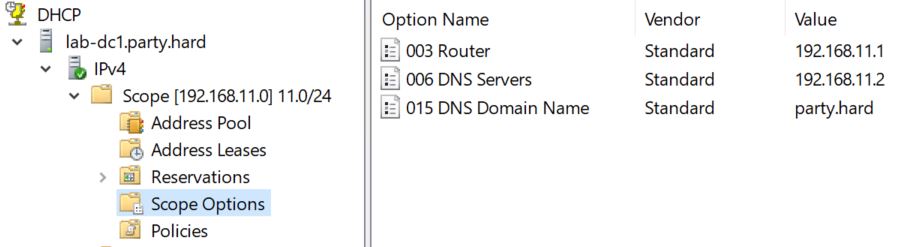
- DHCP
- DHCP RSAT
- DHCP authorize
- DHCP scope configuration
LAB-TEST — 192.168.11.10 (IP was assigned by DHCP)
- PARTY.HARD domain member
After deploying the Active Directory, the Administrator domain account with the standard vagrant password became available. I will try to use this account and log in using VirtualBox Manager.

Summary
It looks like we were able to deploy a virtual environment. There are many different scenarios, it all depends on your tasks, wishlist, RAM size and disk subsystem speed 🙂
In the next part we will try to increase the size of the sandbox and expand scenarios with DFSR component.
See you!
Thank you, Igor!
This is exactly what I was looking for.
It works like a charm!